
Having a Contact Form on your WordPress based website is a must as it will allow your visitors to contact you with any inquiries they might have. Of course, the old-school method of posting your email anywhere on the website is always an option, but here are three primary reasons why having a Contact Form is way better than sharing your email on your website:
By default, WordPress does not include any functionality for creating and managing Contact Forms. This means that if you would like to have such, you will have to consider adding a plugin for that purpose. While there are many plugins for contact forms, the “Contact Form 7” in particular makes it quite a simple task. The plugin comes with various useful functionalities:
Now that you know what this powerful plugin can do let’s review each and every feature it offers in the next lines of this tutorial.
As we have mentioned, “Contact Form 7” is a WordPress plugin. Therefore, you will have to install it first before you can start utilizing its features.
To do so, please log into your WordPress Admin Dashboard. You can do that by accessing your domain followed by "/wp-admin", i.e., "yourdomain.com/wp-admin", where "yourdomain.com" stands for your actual domain name.
Once logged, please navigate through the left-hand side menu bar to Plugins > Add New.
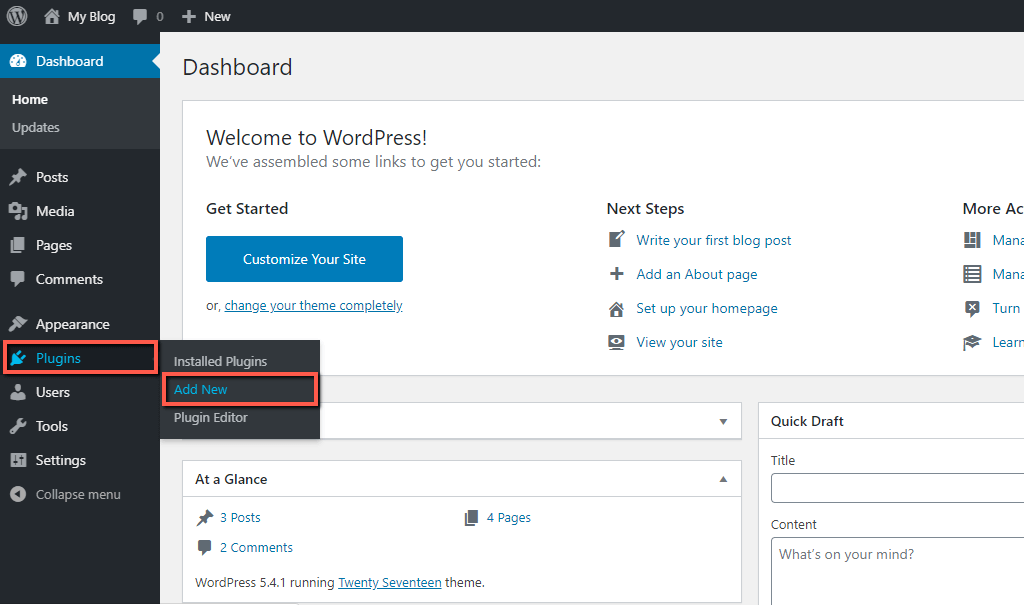
Upon doing that, you will be redirected to the “Add Plugins” page.
When there, please use the Search tool, positioned at the upper right corner of the page, to find the “Contact Form 7” plugin. When you enter the title within the search field, WordPress will start filtering the results and display them in the list below.
Once you see the “Contact Form 7” plugin in the list of results, please click on the "Install Now" button.

Upon doing that, the plugin installation will be initiated. Please allow it with a few moments to be successfully completed. When the plugin is installed, the “Install Now” button will be converted to “Activate”. Please click on it to enable the plugin and get it ready for use.

The moment you click on the “Activate” button, WordPress will redirect you to the “Plugins” page, where you will be presented with a complete list of all currently installed plugins.
Now that the “Contact Form 7” plugin is installed and activated, a “Contact” option will appear on the main vertical navigation menu. When you hover over it, you will be presented with a few options. Please click on "Contact Forms" to access the management interface.

When redirected, you will see the default "Contact form 1" created upon the activation of the plugin. This is a standard Contact Form, which contains only general fields, such as name, email, subject, and message.

As you can see, the Contact Form is assigned with a "Shortcode". In fact, each Contact Form you create will be assigned with such.
This shortcode is a specific code that WordPress supports. It allows you to display the Contact Form by attaching it to files or create objects that would normally require lots of complicated coding.
In case you would like to use the default Contact Form for you can jump straight to the last Assigning the Contact Form to your “Contact Us” page section of our tutorial.
If you find the default Contact Form insufficient, you can always create a new one and customize it based on your individual requirements.
For a start, please click on the "Add New" button positioned at the very top of the "Contact Forms" page.

Upon doing that, you will be redirected to the Contact Form creation page.

For now, please add only the title of your new Contact Form and click on the "Save" button to finalize the creation. In the following section, we will review the customization process in detail.
Now that you have created your new Contact Form, you might want to further customize it and give it a personal touch.
To do that, please go back to the “Contact Forms” page. Once you locate the Form within the list, please hover over it and click on the "Edit" link.

Once this is done, you will be redirected to the "Edit Contact Form" page, which looks exactly like the Contact Form creation interface.
As you can see, it consists of four separate tabs that hold various settings related to the Form.
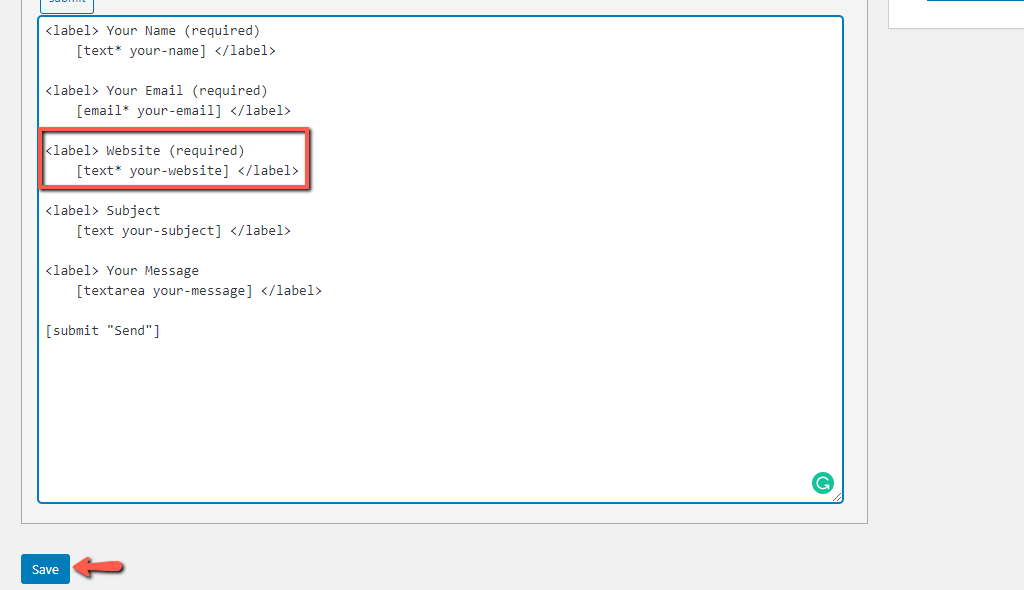
The first, "Form" tab contains the actual code of the Contact Form. By default, it consists of “Your Name”, “Your Email”, “Subject”, and “Your Message” fields in the coding section.

Each of these fields is actually represented as a code segment which starts with an opening HTML "label" tag and ends with a closing HTML "label" tag. You can always add more tags with different information required from the visitor. Between the "label" tags, you will have to insert the title of the field you would like to display in the Contact Form. Depending on the type of field you need, a different tag has to be inserted between "label" tags too.
For example, you may require your visitors to provide their websites. First, you have to enter the opening and closing "label" tags. Between them, you have to insert the value (title), which will indicate the required information your visitors must provide. For example, "Website".

In order for the user to be able to enter the information, an actual field will be needed. “Contact Form 7” comes with a large variety of shortcodes depending on the type of field you need. Each tag is presented as a small, clickable button right above the content of your Form.
The first one is the “text” tag. It provides a standard text input field for your users to fill.
When you click it, a new dialog will appear. Please make sure to tick the "Required field" checkbox in case this will be a mandatory field. In such a scenario, your visitors will NOT be able to submit their message unless they provide the required information. You may also customize the name of the tag by changing the value in the corresponding "Name" field. When you are ready, please click the “Insert Tag” button at the bottom of the window.
More information on the tag syntax form you can find in Contact Form 7's official documentation.

Once this is done, all the information that you have modified in the text box will be added in the “Form” coding area as a simple shortcode.
Next, you will have to simply save the changes by clicking on the “Save” button at the bottom of the coding area.
Note that any changes performed to the form will be automatically applied and displayed on your website frontend in case the form is already assigned to a specific page.
Second is the “Mail” tab.
By default, the Contact Form obtains the emails from your WordPress configuration. Within this tab, you will be able to change the sender and recipient email addresses. In addition, you can customize the subject and the body of the automated email messages sent to you when a visitor submits a message within your Contact Form. You can also include attachment files to the automated message if necessary.

When you perform the desired changes, please, click the “Save” button at the bottom of the page to apply them.
Third is the "Messages" tab. Under it, you are able to customize the notifications displayed to your visitors while performing certain actions on the Contact Form. For example, when they successfully submit their message, when a specific error is encountered, when the provided email cannot be verified, and so on.

As with the previous two examples, you have to click on the "Save" button at the bottom of the page if you perform any changes.
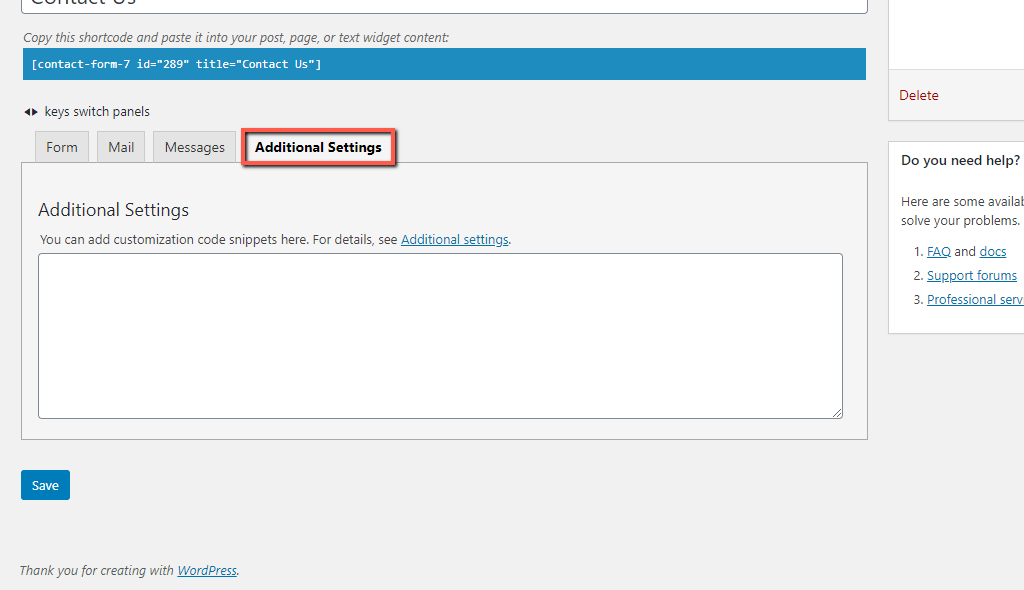
The last “Additional Settings” tab is intended for creating more-complex Contact Forms. If needed, please check Contact Form 7's official documentation for further reference.
When all desired changes are performed, it is time to copy the shortcode of the Contact Form. You can do that either directly from the individual Contact Form page, or from the list of Contact Forms back at the primary "Contact Forms" section.

Once you have the shortcode copied, you are ready to jump to the last step of this tutorial.
To display the Contact Form on your website frontend, you will need to assign it to a particular page. We believe that in most cases, that will be the "Contact Us" page. To locate the page, you have to navigate through the left menu bar to Pages > All Pages.

In the list of pages, please locate the desired page, hover over it and click on the "Edit" link.

Upon doing that, you will be redirected to the familiar page editing interface. All let to be done is to paste the code in the page content box and click on the "Update" button to apply the change.

Once this is done, you may go ahead and check your brand new Contact Form. We will strongly advise you to test it out and ensure it functions properly, and the messages are successfully submitted and delivered to your email account.
Once you confirm everything works as expected, you are all good!
Congratulations! In this tutorial, you have learned how to configure a Contact Form in your WordPress based website. And with that, eased your visitors to get in touch with you whenever needed. We sincerely hope your new Contact Form is functioning as expected, and it will help you improve the communication with your website users.

Sebahat is a young and bright woman who has become an invaluable part of our team. She started as a Customer Care Representative, mastering that role and, along the way, growing into a tech-savvy individual who is well acquainted with every support layer of the company. Driven by her aim to improve our customers’ experience constantly, she is committed to enhancing the extraordinary support we deliver.
Learn more about Wordpress in the other tutorials that we have:
