Learn WHM

The Web Host Manager will allow you to control your VPS/DS services via your Internet Browser!

• Last Updated: 02/06/2020
• ( 9 minutes reading )

How to modify cPanel accounts in WHM

Introduction

The “Modify an Account” function can be very useful whenever you want to make changes to an existing account. The most common changes you are likely to make are in regards to the primary domain or to the Disk Space usage of the account as everything else is quite situational and depends on your personal preferences. It has quite a few options, especially towards the resource limits, so let’s get right into it!


Accessing the Modify an Account feature

First, you need to log into the WHM service for your VPS or Dedicated Server. If you are not sure how to do that, please check our How to Access WHM tutorial. After you have logged in, please use the search bar on the left side of the page and type “Modify an Account”.


Accessing the Modify an Account feature


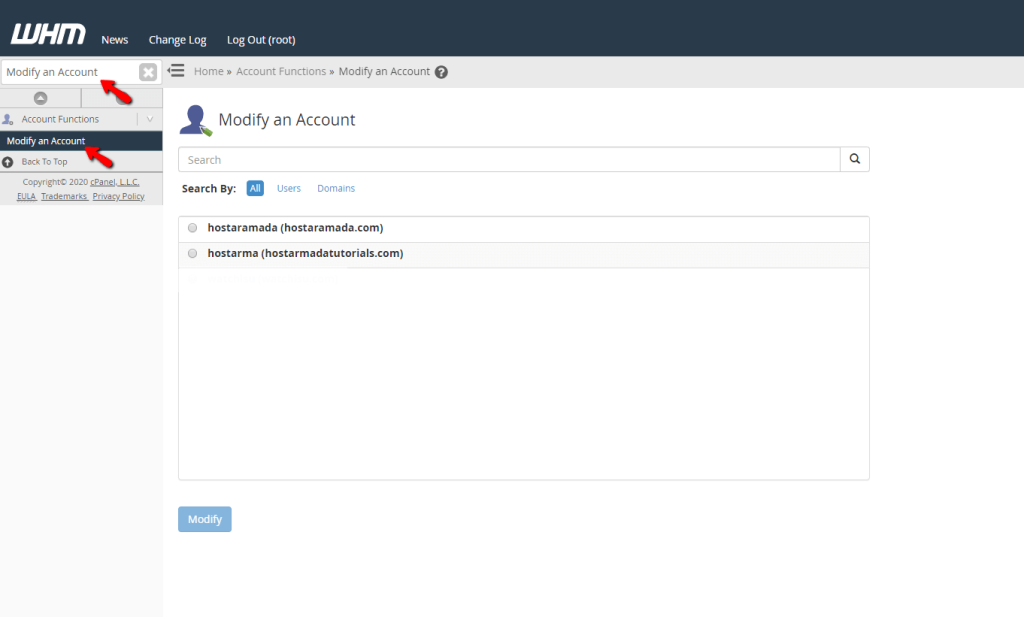
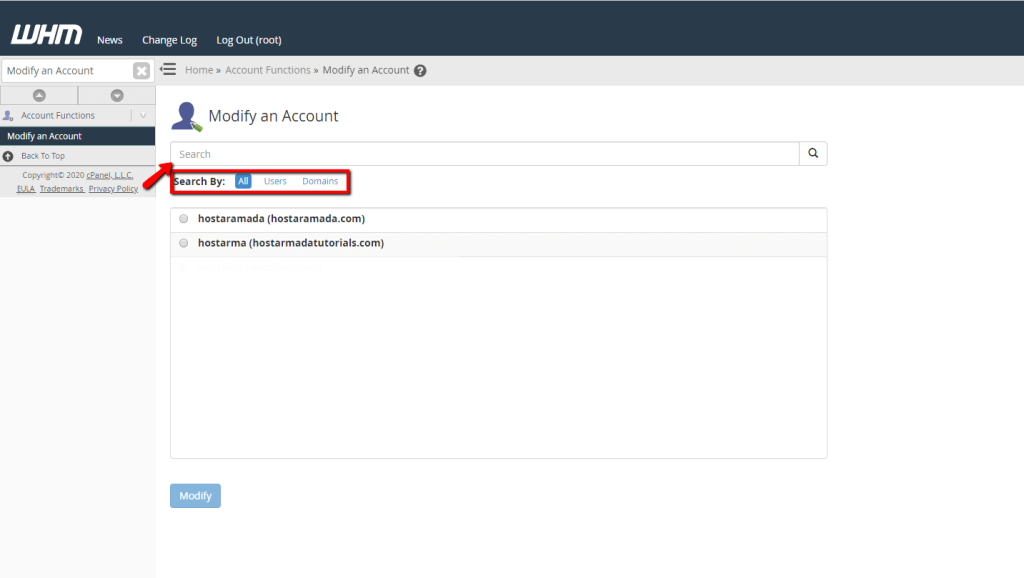
WHM will present you with a single result which after you click on, you will be redirected to the  “Modify an Account” page. When you land there, you will see two things - a search bar and a list of users. The search bar can filter the accounts by users, domains, and both.


Filtering cPanel accounts


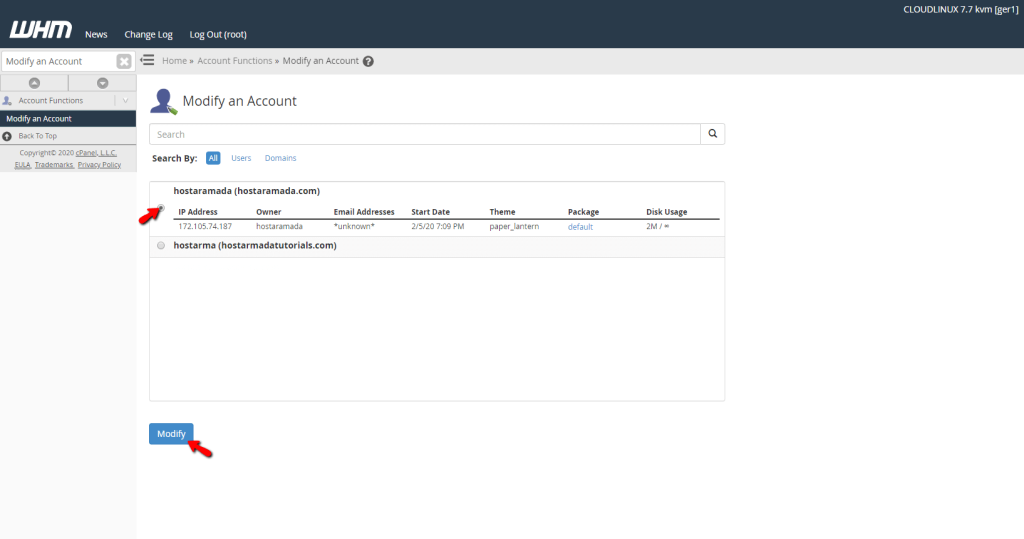
When you locate the account you want to edit, please select it by clicking on the radio button positioned before the username of the account and then press the modify button at the bottom of the page.


Selecting cPanel account to edit


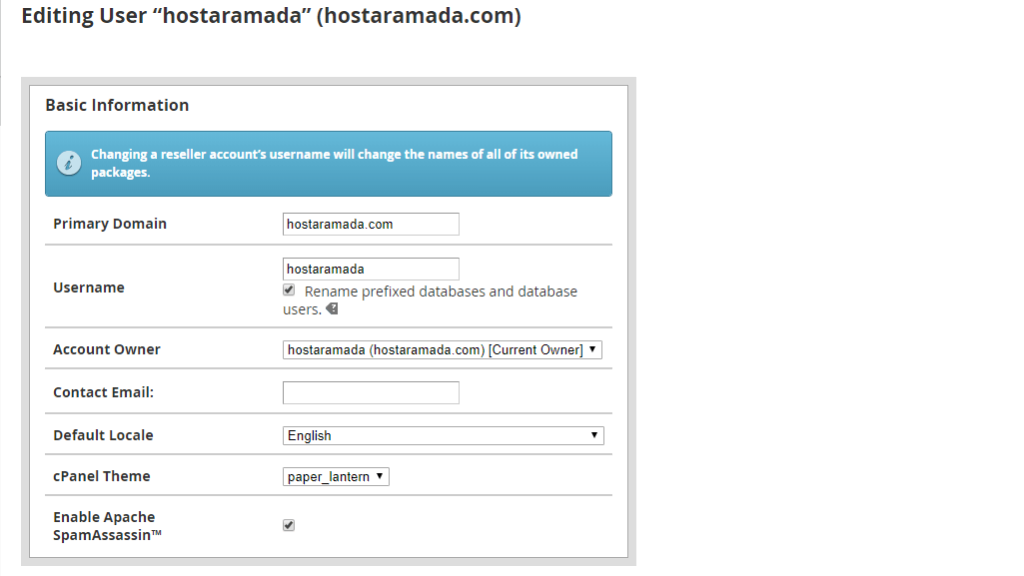
This will open the modification page, which has quite a few options that we will be discussing in the next paragraphs of this tutorial.


Modification process

The first thing you will notice is the “Basic Information” section. The changes you can make there are as follows:

  • Primary Domain Changes the primary domain of the account. This could be useful if you do not plan on using the domain anymore and you want to change it for a new one. 
  • Username — Changes the username for the account. You need to be really careful with this, as the database prefixes are bound to it and you might end up with websites that are not working.
  • Account Owner Changes the owner of the account. You could set this to a different reseller, make it own itself, or set its owner to the “root” user.
  • Contact Email — Changes the contact email. This comes in handy when you are not using the previous email account and you want to change it to something you are using now.
  • Default Locale — Changes the locale.
  • cPanel Theme — Changes the theme used by the account.


Basic Information section


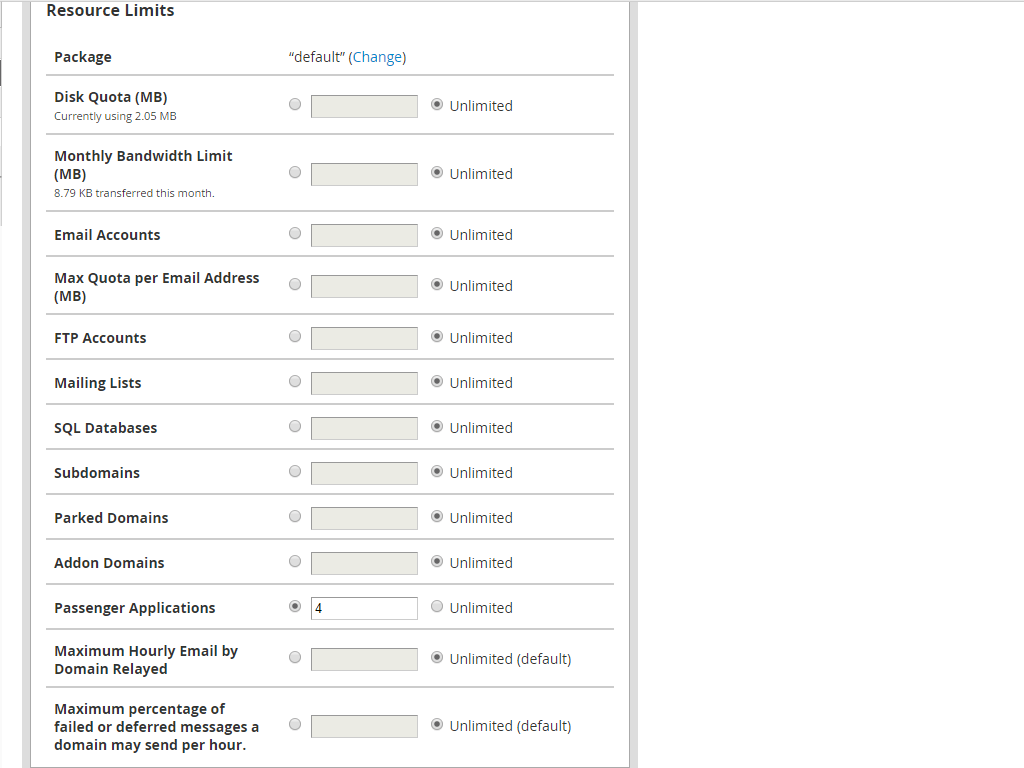
The second section is called “Resource Limits”. You have a lot of options here that can be manually changed, or you could simply select a package that has preset resources just so you can apply those immediately to the edited cPanel account. We will be looking at the packages in a separate tutorial but keep this in mind.

  • Package — Changes the package of the account.
  • Disk Quota (MB) Changes the disk quota of the account.
  • Monthly Bandwidth Limit (MB) — Limits the bandwidth for the account.
  • Email Accounts — Limits the number of email accounts this cPanel account can create.
  • Max Quota Per Email Address (MB) — Limits the size of each email account this cPanel account can have.
  • FTP Accounts — Limits the number of FTP accounts that can be created.
  • Mailing Lists — Limits the number of mailing lists the account can have.
  • SQL Databases — Limits the maximum number of databases for the account.
  • Subdomains  Limits the maximum number of the account’s subdomains.
  • Parked Domains — Limits the maximum number of the account’s parked domains (aliases).
  • Addon Domains — Limits the maximum number of the account’s Addon Domains.
  • Passenger Applications  Limits the maximum number of the account’s Passenger applications.
  • Maximum Hour Emails by Domain Relayed  Limits the maximum number of emails that a domain can send per hour.
  • Maximum Percentage of failed or deferred messages a domain may send per hour — Defines the maximum percentage of failed or deferred messages that a domain sends before your server temporarily blocks outgoing mail from that domain.


To change the value for each of the options in this section you will have to click on the radio button that enables the customization of the value. Once that is done, the grayed-out text box will be activated and you will be able to type the desired number.


Resouce Limits section


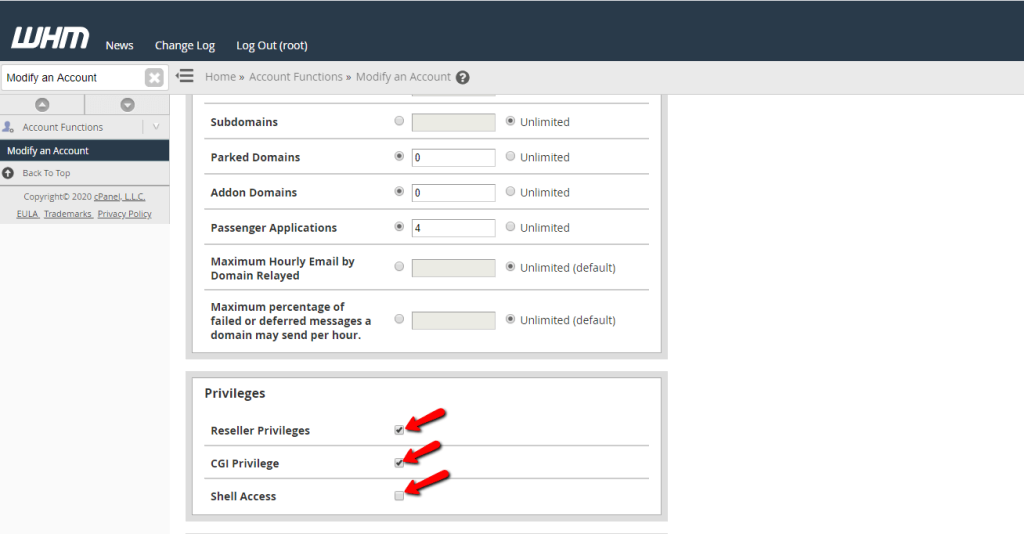
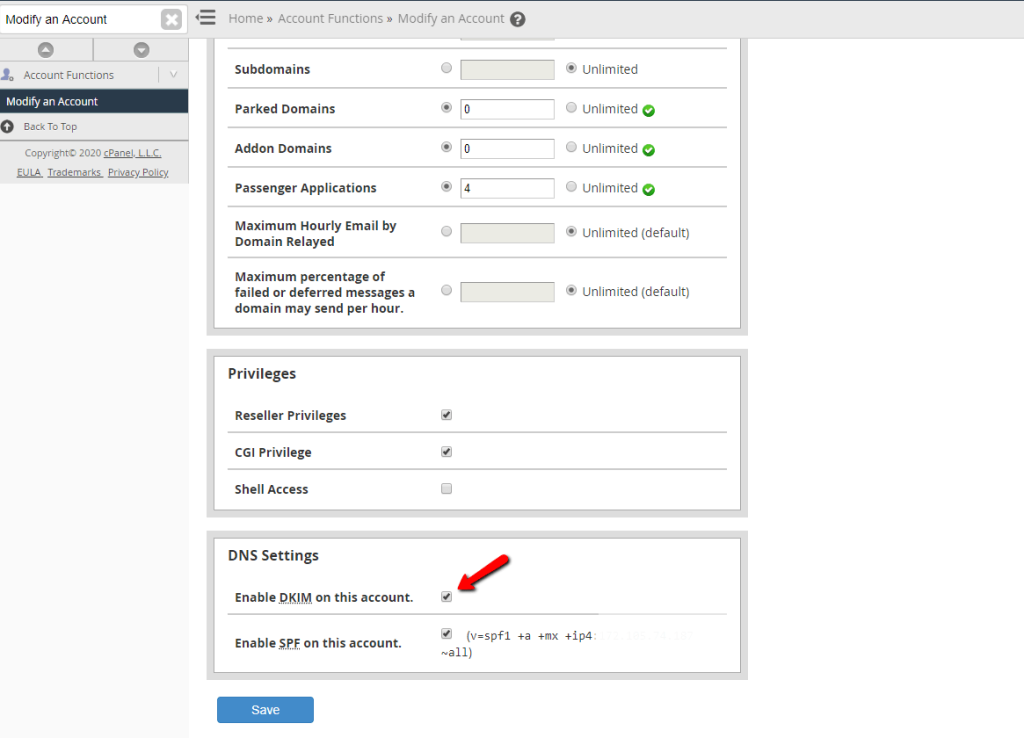
The third section will allow you to edit the Privileges of the account.

  • Reseller Privileges — Enabling this will grant reseller privileges to the account.
  • CGI Privileges — Enabling this will grant the ability to execute CGI scripts on the account.
  • Shell Access — Enabling this will provide SSH access for the user accessing the account.


Privileges section


The last section will allow you to make DNS changes.

  • Enable DKIM on this account — Selecting this checkbox will create DKIM records for all of the account’s domains.
  • Enable SPF on this account — Selecting this checkbox will create SPF records for all of the account’s domains.


One important thing you need to be aware of is that if you select either of these checkboxes, each existing SPF OR DKIM record will be deleted from the account and replaced with the default ones for the server.


DNS Settings section


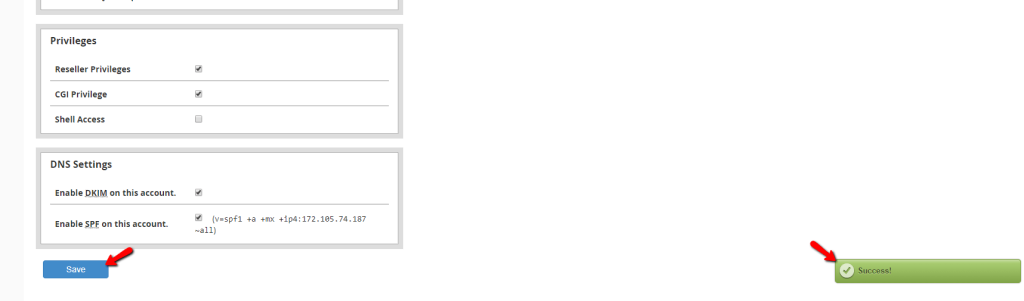
Finally, when you are done with all the modifications, you can click the “Save” button located at the bottom of the page. If the package you have chosen is set to the default one or if the package you have assigned has similar to the configured values, the changes will be applied immediately.


Saving the changes


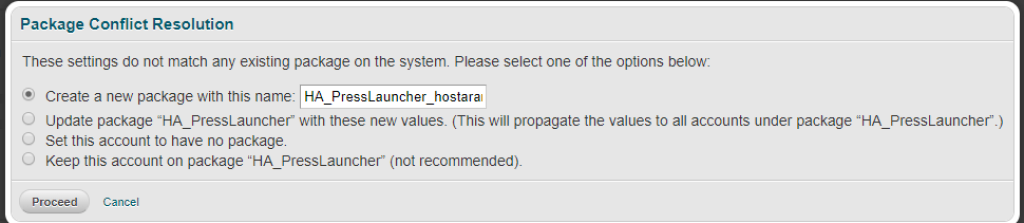
Otherwise, the “Package Conflict Resolution” window will appear if you attempt to save settings that do not match the account’s assigned package. If that dialog box appears, select the desired option and then click Proceed. You can choose one of the following:

  • Create a new package with this name — This will create a new package with the values you selected. You will be able to downgrade/upgrade to this package and you will be able to choose a name for it.
  • Upgrade/downgrade the account to a package that matches the new properties — This will only appear if the values you have changed, match with a package that already exists.
  • Update package (package name) with these new values — Update the package with the new settings. This is not recommended at all, as all of the accounts using this package will be modified in the process.
  • Set this account to have no package — If this option is selected the account will not be associated with any package or in other words will remain without a package.
  • Keep this account on the package (package name) (not recommended) — Continues to associate the account with its current package. This is not recommended as the system could overwrite the chosen account settings with the package settings.


Package Conflit Resolution dialog


That’s it! We have gone through all there is to learn about the “Modify an Account” feature in the WHM control panel. If you have any doubts or questions about any of this, please feel free to reach our Technical Support Crew, as they will be delighted to help you out as best as they can.


...
Sebahat
Content Marketing Specialist

Sebahat is a young and bright woman who has become an invaluable part of our team. She started as a Customer Care Representative, mastering that role and, along the way, growing into a tech-savvy individual who is well acquainted with every support layer of the company. Driven by her aim to improve our customers’ experience constantly, she is committed to enhancing the extraordinary support we deliver.