
MySQL utilizes the client-server model of communication between a MySQL Client and a MySQL Server. For MySQL Client, we can consider every website, script, opensource web application (such as Wordpress, Joomla, Drupal, etc.) or third party software used to connect and manage databases (such as phpMyAdmin). As for MySQL server - it is always the MySQL service running on the Web Hosting Server where your Web Hosting Account with us is being hosted. When the MySQL client is connecting to the MySQL server a MySQL connection is being utilized.
When the MySQL Client is hosted on the same server where the MySQL Server is, then the performed connection is considered as local since the connection does not leave the same server.
However, when the MySQL Client is located elsewhere (for example on your local computer or even another Web Hosting Server) and it is connecting to the database hosted on your Web Hosting Account with us, the connection is considered as remote.
A good example of a remote connection is when a programmer is using a local IDE to write some code for a dynamic website. He needs to utilize a MySQL database, but the same is hosted on a Web Hosting Account with us. To connect to that database from the IDE, the programmer configures the database credentials into the IDE and then connects to the database remotely since the connection is initiated from "outside" the Web Hosting Server. However, if at some point the programming of the website is completed and the code is uploaded to the Web Hosting Server, the connection will become local since it is then performed from "inside" the same server where the database is being hosted.
Now that you understand how MySQL connections are categorized, let's discuss how these connections are being secured. As we mentioned in our example above, every MySQL Client has to authenticate in front of the MySQL Server. The authentication is achieved with a pair of MySQL Username and MySQL Password. Although the authentication is sufficient enough to protect access to a database, there is another layer of security that is actually the main subject of this tutorial - restricting the remote access to a database on IP Address level.
cPanel provides you with the option to manage the allowed for connections IP addresses. In fact, by default, the only allowed connections to your databases are indeed those initiated from within your Web Hosting Account. Therefore, in order to connect remotely, you will have to "allow" the remote IP address that will connect to your databases. This could be either your local computer's IP address or the IP address of any other computer that should be connecting. Let's see how that can be achieved.
To begin managing the allowed IP addresses for connections to your databases you will first have to access the "Remote MySQL" feature of cPanel. To do that, first, you will have to login to the cPanel service for your web hosting account. If you are not familiar with how to achieve that please check our other tutorial on the matter - "How to access cPanel".
Once logged into cPanel you should see all the features cPanel has to offer. The "Remote MySQL" feature is located within the "Databases" feature group which you should be able to easily locate.
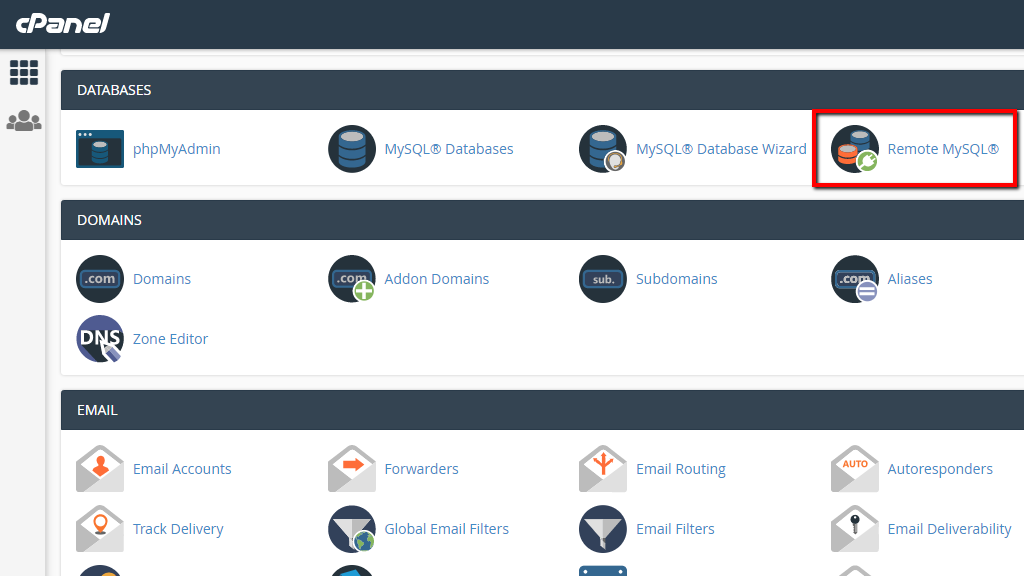
Clicking on the feature will redirect you to a brand new page where further information on the feature will be provided as well as the management tools for the allowed IP addresses.
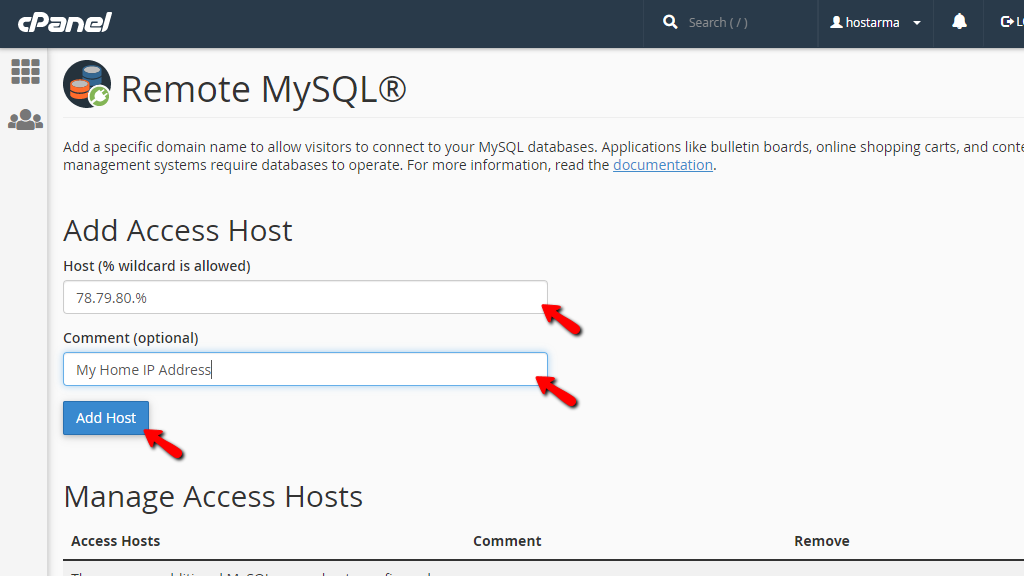
The "Remote MySQL" page interface is relatively simple to understand making the process of managing the allowed IP addresses for connections to your databases pretty simple. The first section of the page is called "Add Access Host". In this section, you will be able to easily add new IP addresses. Let's review the procedure.
The first field you will have to fill is called "Host (% wildcard is allowed)". In this field, you will have to enter the actual IP address allowed for connections to your databases. For example, if you are allowing access to your local computer you should be aware of your local IP address, however in case you are not, please check your IP address using any free online IP checker.
When you know the IP address, then please go ahead and insert it into the "Host" field. Please note that the field also accepts wildcard entries. For example, if your local IP address is let's say 78.79.80.81 and you know that it is dynamic meaning that it often changes, you can use the "%" sign to replace a range of IP addresses. Let's say that the range within which your IP address changes is between 78.79.80.0 and 78.79.80.255. To allow that whole range, please input 78.79.80.%. As you can see we have replaced the last group of digits in the IP address with the sign indicating a wildcard.
Next please enter a comment for this IP address. Although comments are optional, we strongly recommend that you should at least outline who is the owner of the allowed IP address. Considering our example, let's add a comment like "My Home IP Address".
Finally, please click on the "Add Host" button so the IP address can be allowed for connections.
cPanel will add the IP address and will display a message indicating the success or any error in the process of adding the IP address. Please go back to the "Remote MySQL" page by clicking on the "Go Back" link.
As you might have already noticed the IP address you have just added will immediately appear in the next section called "Manage Access Hosts". In this section, you will find all IP addresses allowed to connect to your web hosting account. Please note that by default the IP address of the Web Hosting Server where your account is located is already allowed in that list. Please do not remote that IP address or you might risk some MySQL connectivity issues for the websites on your Web Hosting Account.
In this section, you will see a simple table with three columns:

For each IP address, you will be able to update the Comment and of course to delete the IP address. Please note that cPanel does not offer options to edit any allowed IP addresses. To edit an IP address you will have to first delete it and then add it again.
That is all! You are now well aware of how to allow new IP addresses for connections on your databases. In case you are experiencing any technical difficulties adding new IP addresses or this tutorial was not sufficient enough to convince you in how simple it is, please feel free to contact our Technical Support Team and request from them any assistance you might need managing the allowed IP addresses for connections to your databases.

Simeon is an experienced System Administrator with over 10 years of experience in the Web Hosting field. He is recognized unanimously as the man behind every technical innovation or improvement that HostArmada introduces. Adaptable and responsible, he solves every technical issue that we or our clients throw at him. Every so often you will find him publishing technical content on our website.
Learn more about cPanel in the other tutorials that we have:
